
Guide
Michelle's iPad creative course: your start with Procreate
by Michelle Brändle

The Procreate illustration app is available exclusively for the iPad. It is extensive and has some hidden functions. In this series, I will guide you through the programme with application examples.
In this course you will create an island landscape step by step. I have focussed on layers and brushes. I'll show you how the principle of layers works and how you can use a few brushes from the programme to add great textures and shading to your illustration. You'll also get to know the selection tool.
This is the second part of my Procreate series. Even if you missed the first course, you should still be able to follow along. I explain everything step by step. You can also look up the course later on the following page:
In addition to the explanations and pictures, you will find the video recording with the creation process for your own island here.
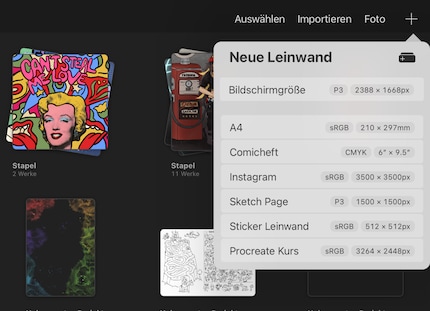
Open a new canvas on the start page (gallery) of Procreate. Analogue to the first course, use the size 3264 × 2448 pixels. Otherwise, of course, a simple A4 landscape format will also work.
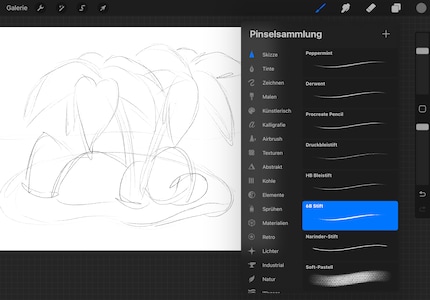
To select a brush, tap on the brush icon. Take the "6B pencil" from the "Draw" category. I always use this for sketching. It behaves most like my analogue pencils. Now use a darker grey to draw the template for your palm island. First the shape of the island, two palm trees with a few leaves on all sides and a few stones scattered on the ground. Just as you feel. I've kept the shapes as simple as possible for this course.
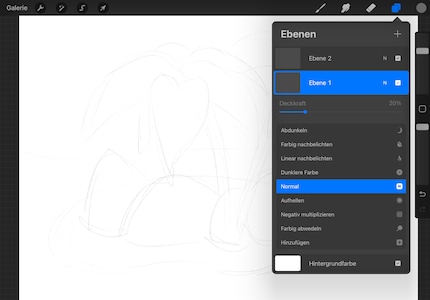
Tap on the layer icon at the top right, which is the two squares on top of each other. Add a new layer using the plus sign. This will appear above the layer you have currently activated. However, you can also move it using drag-and-drop.
Set the opacity of the pencil sketch to 20 per cent. To do this, click on the layer and lower the displayed slider accordingly. You can now paint the final outer lines of your island on the new layer and see the pencil sketch as the basis underneath.
For the outer lines, change the colour at the top right from grey to black. Then select "Artist's ink" from the brushes in the ink category. I have adjusted the settings a little. You can do the same here.
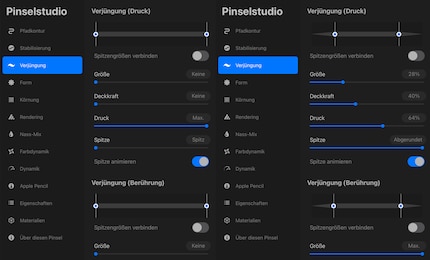
Tap the brush a second time. This will automatically open the settings mode for the brush, which Procreate calls Brush Studio. Most things fit as they are. For stabilisation called "Streamline", set the slider to maximum and for tapering, pull the tips of the print tapering a little further into the middle. To ensure that both sides are equally thin, activate the "Combine tip sizes" function below. This will give you an evenly thinning tip when you draw a line - perfect for outlines.
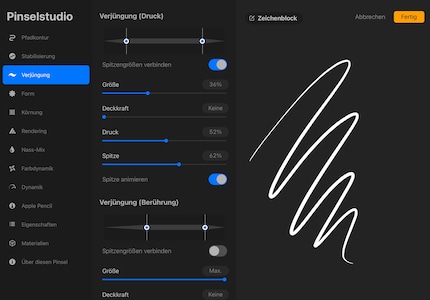
You can test your settings at any time on the drawing pad to the right of the settings. If you are satisfied, click on "Done" in the top right-hand corner.
Now set the size to 15 to 20 per cent, depending on how thick you want the lines to be. Then trace the pencil sketch on the new layer. You can then delete the pencil layer by dragging it to the left with your finger and clicking on "Delete". If you want to keep a layer but don't want to see it right now, you can remove the tick next to the layer. It will then be hidden.
Now it's time to colour in. I always hated that as a child: Just don't colour over the edge - and then it takes forever. Not so with a digital picture. And certainly not if you know about the "Reference" function. Thanks to the reference layer, Procreate knows which outer lines you want to work with.
Click on your layer with the black outer lines, tap on it again and select "Reference" from the list that appears. Then create a layer below it - by clicking the plus sign in the layer list. I advise you to create a new layer for each colour that you now use. You can then edit each colour individually (structures, shading, etc.). But that's in the next step. Now for the basic colours.
Choose a lush green for the palm leaves. To colour them in, simply drag the colour from the right-hand corner into the leaf. Thanks to the reference setting, Procreate recognises where the boundaries of the leaf are. Do the same with a light brown colour for the trunks and so on. This will colour your image in no time at all.
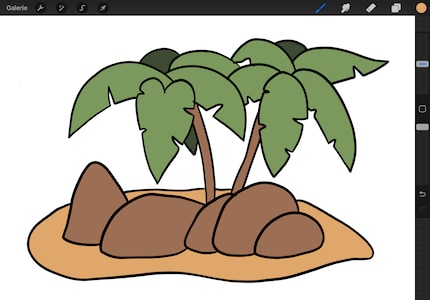
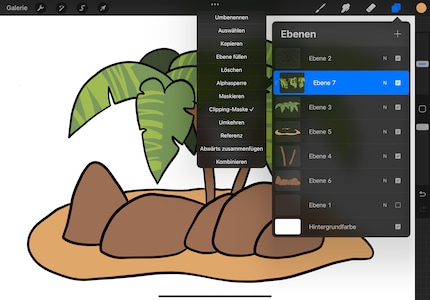
You now have the basic colours on individual layers. However, they still lack some depth and vibrancy. That's why you need to add structure and shading. To do this, take advantage of the "clipping mask". First create a new layer over the green palm leaves. Set the setting for this layer to "Clipping mask". An arrow next to the layer should now point to the green palm leaves below it. This means that they are linked to each other.
If you paint on the clipping mask, you only edit the area that has colour on the layer below. Accidentally painting over the edge is therefore a thing of the past here too.
In the first course, I recommended the "alpha lock" for the same effect. You activate this via the setting of the layer you want to edit. It's quick and easy to use. As you add a new layer with the clipping mask, you can edit it without changing the layer you have already created.
First paint the structures for the leaves and trunks of your palm trees. Use the "round brush" from the painting brushes. But in an adapted form. As I have changed some of the settings compared to the original, you will find a comparison in the illustration below. I have also set the stabilisation to 12 per cent. To the right of the setting, you can test how your adjustments have affected the brushstroke in a colour field.
Now the selection tool is added. This can be found at the top left as an S icon. You can use this to select individual areas of a layer that you want to adjust. You can either use the "Automatic" setting at the bottom. You can then click on the area you want to select. Or, as I prefer for more complex shapes: the "Freehand" setting. This allows you to trace the outline of the area to be edited with the pen.
First, work on the clipping mask you have just created for the green palm leaves. Select a single leaf by moving along the outer lines with the selection tool. The starting point is marked as a grey dot. If you tap on it when you are finished, everything will be shaded grey except for your selected point.
Then use a slightly lighter green colour and your new round brush. Tap the green with your finger for a little longer. Select exactly this colour. Then tap on the colour circle at the top right and move the colour selection to a lighter area.
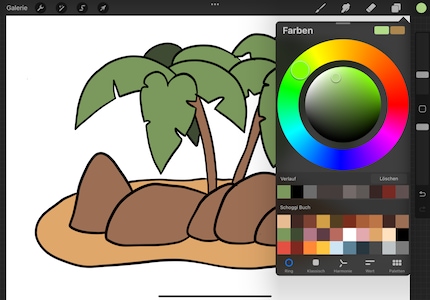
Use the round brush to draw lines in the selected palm leaf. Only paint the left half of the leaves that point in your direction. If the lines extend beyond the half, you can use the eraser to erase any excess lines. This is where the advantage of the clippy mask comes into its own: if you had used the alpha lock, you wouldn't be able to erase anything without making the whole page disappear.
Now repeat this step for all leaves. To deselect each one, click on the selection tool again.
When you have finished with the leaves, create a clipping mask over the brown trunks and proceed in the same way: select a lighter brown colour, mark the trunks with the selection tool and draw lines.
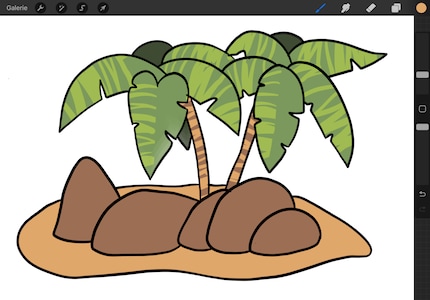
For the stones, I used the "Sawtooth" instead of the round brush for the material brushes. As you are working on all the stones together, you don't have to select them individually. Use a slightly lighter brown colour to paint the grainy light reflections on the top of the stones. For finer gradations, reduce the opacity a little more.
For the sand, proceed in the same way, again with a different brush. I use the "fine nozzle" from the spray brushes with medium opacity in very light brown.
You can colour the background for the sky in light blue. All you have to do is click on it and set your desired blue in the colour wheel.
For the water, create a new layer at the top above the outlines. Then paint waves in dark blue on the lower edge of the island. Then reduce the opacity of the layer slightly.
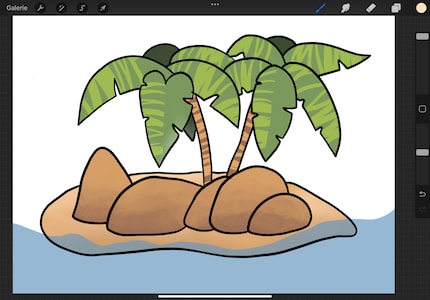
Then paint the sea over the height of the sand island with the same blue colour on a new layer below all the other layers. Now it looks as if the island is floating in the water.
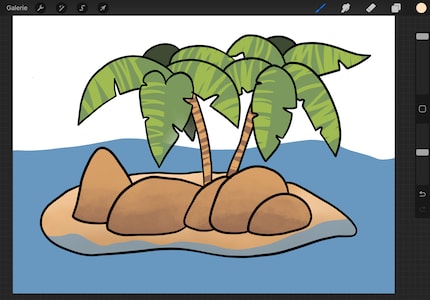
On this water layer, paint accents in dark blue on a clipping mask. I used the "Soft Brush" airbrush with reduced opacity for this. The "Fine nozzle" spray brush is also suitable for more texture. Then add a few white clouds to the sky - on one layer, just above the background, at the very bottom. Mine were created with the "Tarraleah" artistic brush.
Now comes the last step with a final new layer at the top. Paint the details on it in white. First with the "Dried ink" ink brush. Use this to paint the foam of the water and to suggest a few waves.
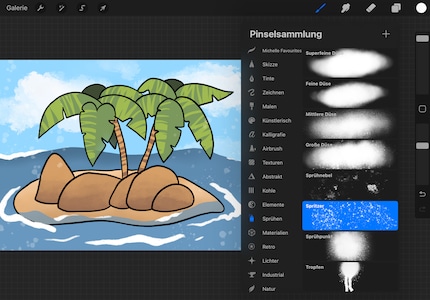
Use the "Spritzer" spray brush to add subtle accents to the picture, just as you like. It's a matter of feeling that you don't spread too much or too little colour on the picture.
Once you are happy with your result, it's time to share. To do this, click on "Gallery" on the far left. This will take you back to the folder with all your images. If you drag the image to the left with your finger, you can click on the "Share" button that appears and save your island in the desired format. I usually use PNG because it retains the quality of the image. However, the file is relatively large.
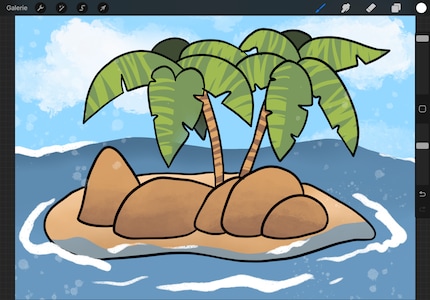
Congratulations, you've created your own island. If only it were as easy in real life as it is in art. If you have any more questions, please let me know in the comments or by email :D
Ever since I learned how to hold a pen, I've been doodling away in bright colours. Thanks to my iPad, digital art has also become part of my life. That's why I love testing tablets – from the graphic design range to the regular kind. When I feel the urge to express my creativity without lugging lots of equipment, I go for the latest smartphones and start snapping away.
Practical solutions for everyday problems with technology, household hacks and much more.
Show all